PyTorch Project Template
Published:
Deep Learning projects sometimes look messy and don’t follow a certain structure. People get into the problem and compete over getting good results. Usually, given the nature of the task, we don’t get the time to think much about the project structure or the code modularity. After working with different deep learning projects and facing problems with files organization and code repetition, we came up with a simple project structure built with PyTorch.
We are proposing a baseline for any PyTorch project to give you a quick start, where you will get the time to focus on your model’s implementation and we will handle the rest. We are:
Providing a scalable project structure, with a template file for each component. Introducing the usage of a config file that handle all the hyper-parameters related to a certain problem. Embedding examples from various problems inside the template, where you can run any of them independently with a single change in the config file name. How is all this happening? Let’s see.
Project Architecture:
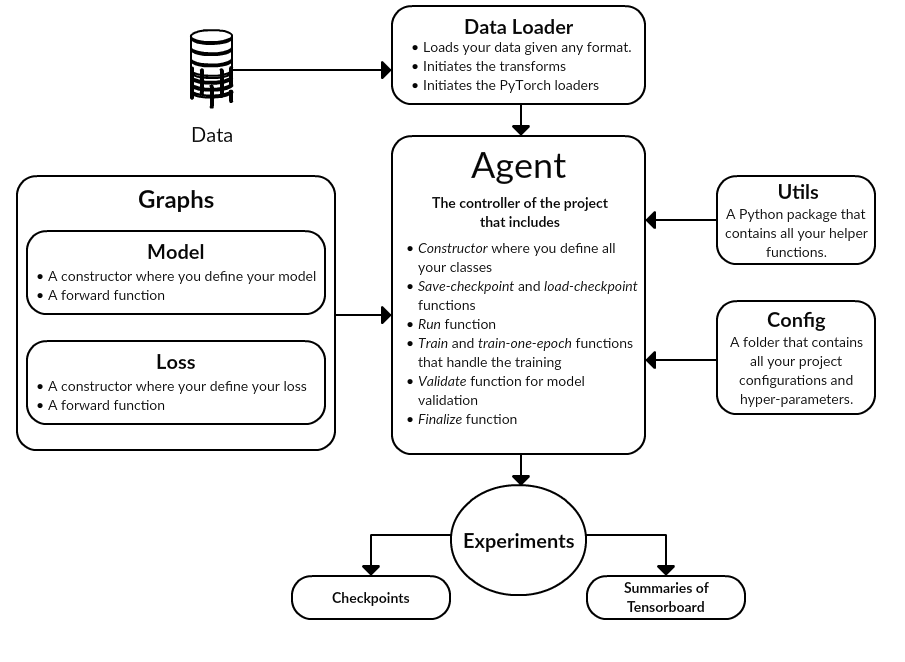
We have four core components which are the configurations file, agent, model and data loader. We will walk through an example, implemented on mnist classification, to elaborate on the importance of each one of these components.

Template Tutorials can be found here.
Cofigurations:
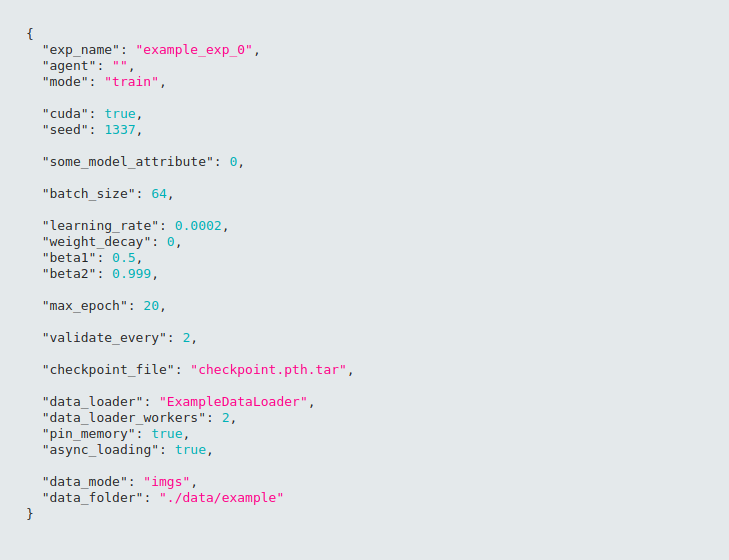
his is the core contribution of our approach; we have a json config file that includes all the hyper-parameters related to the problem. All the keys and values are parsed into a dictionary that can be accessed all over the project for ease of use. It can specify the model name, agent name, the data-loader and any other variables related to them.
Below is an example for a config file that can be adapted to any project. 
The usage of a config file is what keeps your code dynamic. This includes all the hyper-parameters that control your data, all training variables and model saving.
Should you have any new parameters that you think can be added to the configurations file, feel free to directly embed them into the configurations to be used within your project.
Agent
his is where all the action take places. The agent is responsible for initializing the model and data loader. It also handles the training and validation operations including model saving and loading.
We are providing a base agent to inherit from; it includes the following functions that should be overridden in your custom agent:
- functions for checkpoint loading and saving
functions for training and validation
So, if we want to initialize an agent for an Mnist model, it will be as shown below:
After that, we will define and overload the functions in the base agent as needed in our example agent.
Graph
This is where you define your graph, with all its layers either the standard layers or the custom ones that you define yourself. In addition to that, we define the loss functions.
In the same directory but in a neighbor folder, we add a class for the loss used by our model. This is in order to keep all the graph components in the same place.
Data Loader
A dataloader is the class responsible for organizing your dataset and preparing the loaders for training, validation and testing. It can have different modes based on what it reads from the configurations. These modes include ‘numpy_train’, ‘imgs’, ‘donwload’, etc. It is up to you to introduce and implement any mode for data loading.
How to run
We have a single config file per model that is passed into the main function via the run bash script. For every different model or example, you need to change nothing but the config file’s name as an argument upon running. This will enable you to have many models with all their variations inside the same project where you can run any of them using that one single run file given different configs.
Our Contribution
Our template design offers the flexibility of adding new models or datasets. We have added examples in Image segmentation, Object classification, GANs and reinforcement learning. We want this template to be a central place for the well-known deep learning models in PyTorch.
So, we are inviting all the community to contribute to this goal and add their projects to the template in order to have a variety of examples and turn this into the main reference for PyTorch learners.
Visit PyTorch Project Template for better understanding; find below the repos referenced in the template:
ERFNet: A model for Semantic Segmentation, trained on Pascal Voc
DCGAN: Deep Convolutional Generative Adverserial Networks, run on CelebA dataset.
CondenseNet: A model for Image Classification, trained on Cifar10 dataset
DQN: Deep Q Network model, a Reinforcement Learning example.
